For me her quilt was not just another quilt but rather a painting made with fabric. I did ask her what was her inspiration for the quilt and she told us that she had the 2 ladies sitting around in her sewing box for over 20 years and wanted to do something with them before they frayed too badly to be used.
 If you looked closely, the cliff edges behind the ladies were actually taken from a fish fabric! Such was the ingenuity Sue showed with the selection of her fabrics.
We asked how Sue went about selecting the fabrics for the different textures, she said the fabrics chose themselves. She didn't necessarily pre selected them but rather they took a life of their own.
Sue started the quilt by sketching out the picture on the table.

She then traced the area she was working on with wax paper. And cut of the shape of that sketch.

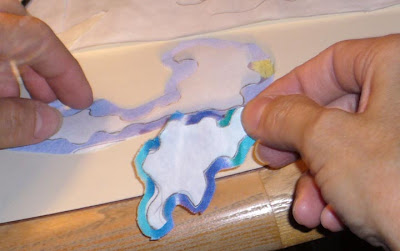
At this time, she already has a fabric in mind, and then proceeded to iron the wax paper on the fabric, on the right side ie on the top of the fabric.

She then trimmed the fabric around the wax paper shape, leaving an allowance of about 1/4 " all round.

Note that the wax paper is ironed right side up.

Then she snipped the fabric around the wax paper at regular intervals to help the fabric turn in easier since the shape of the wax paper does have a lot of curves.

Then the fabric is turned down to ensure that they will lie flat rather easily.

Repeat the steps for the corresponding shape and fabric that you will attach this part to. Sue numbered the pieces to help her remember which piece goes where because after a while you may find that you are working with what looks like jigsaw pictures. When in doubt she returned to the sketch and compared the shapes.

After making sure that the two pieces fit together, she pinned the two.

And started sewing. She used a looped stitch.

I did start with something while I was there but my sewing room is in a mess at the moment. Will put up my work as soon as I start working on it again.
2 comments:
Oh my goodness, that looks waaaay too hard!!! I would have liked to see the demo though.
lv,
Joy
Hi Siti! You've been tagged for seven random facts by MEEEEEE! Check out my blog for rules.
Post a Comment